How to photograph the Venus transit, a solar eclipse, or just the everyday Sun.
How to Photograph The Sun: Venus Transit 2012
(Updated: 7 June 2012)
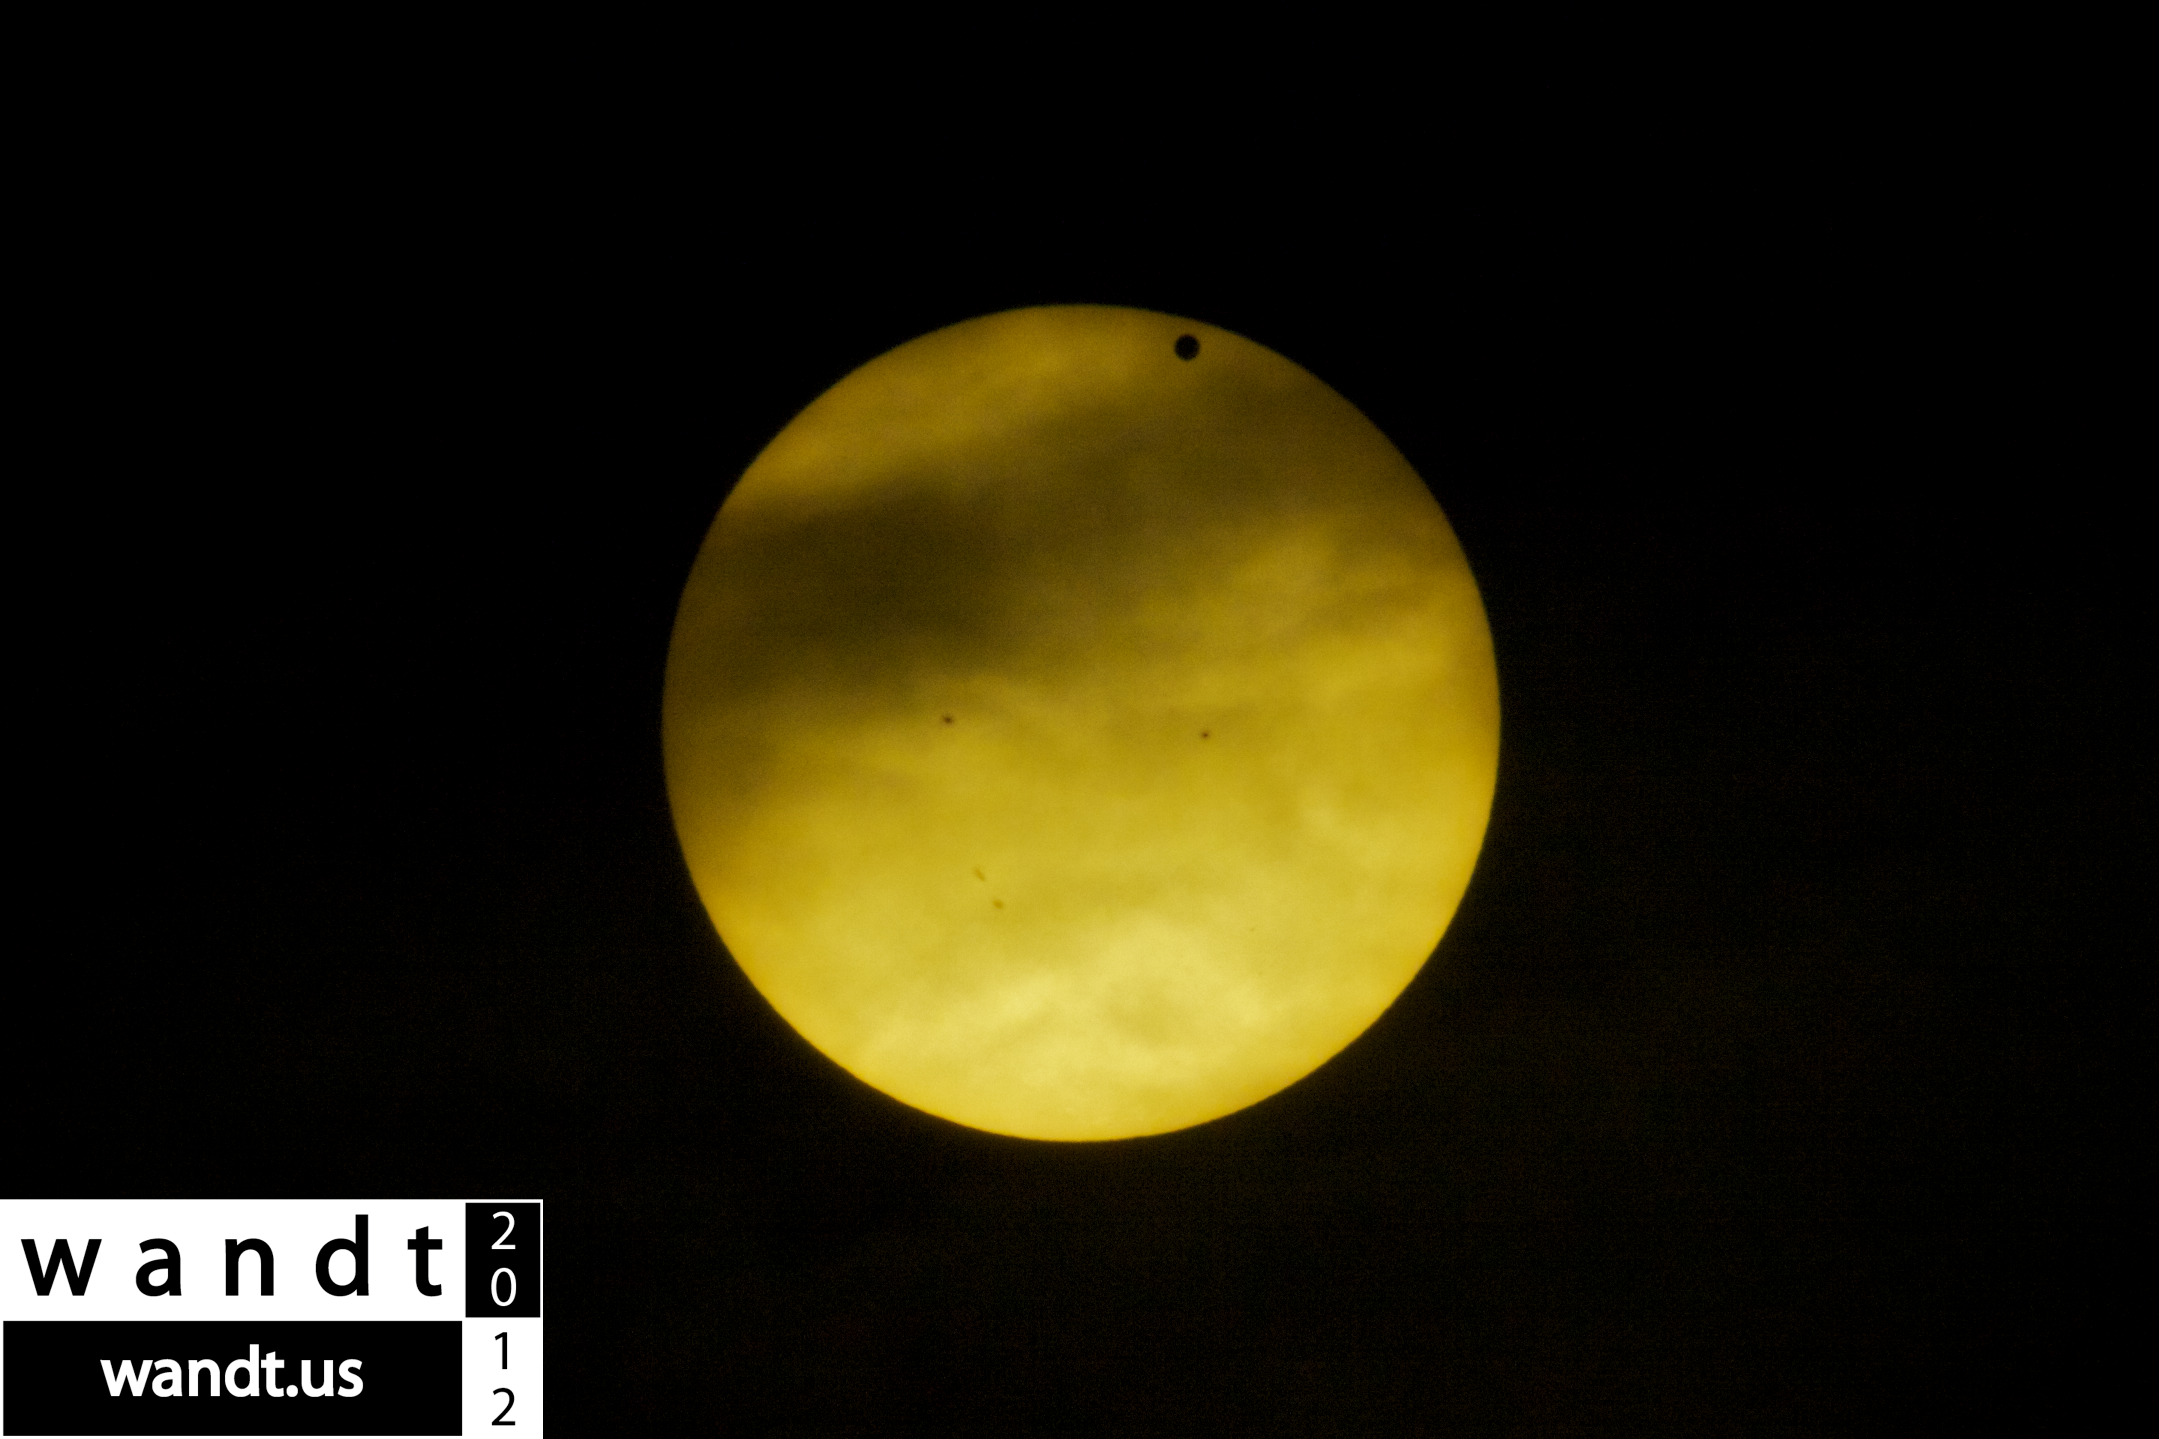
Venus Transit 2012 © Adam Scott Wandt
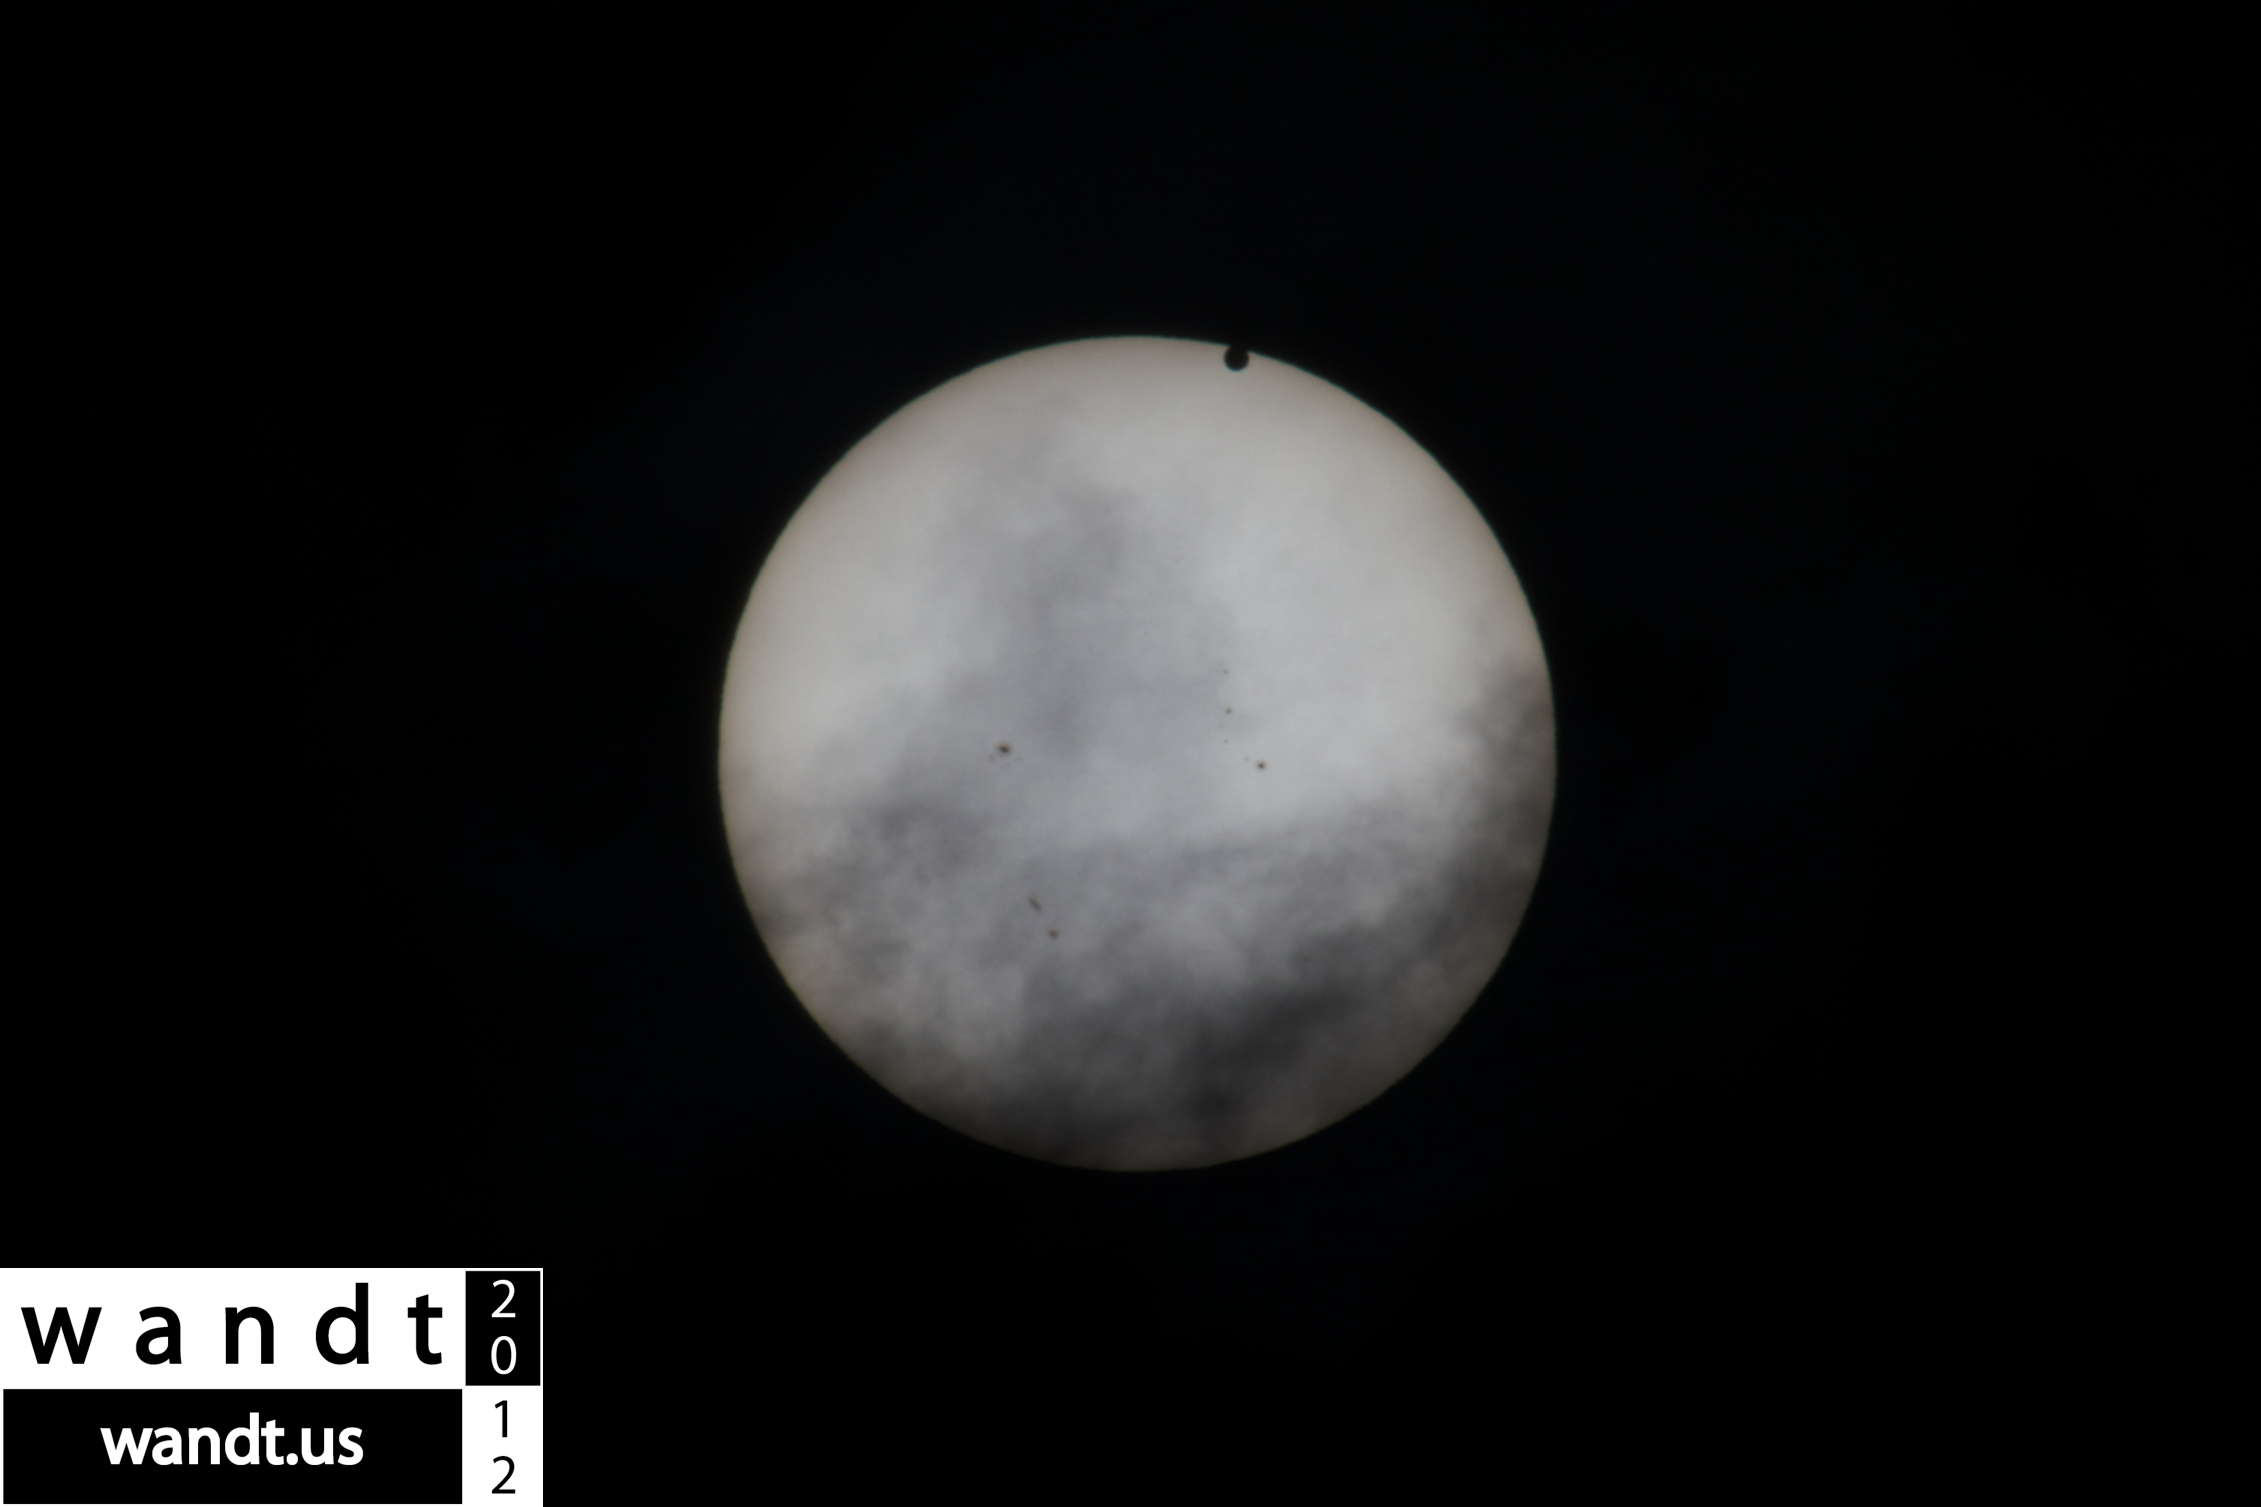
Venus Transit 2012 © Adam Scott Wandt
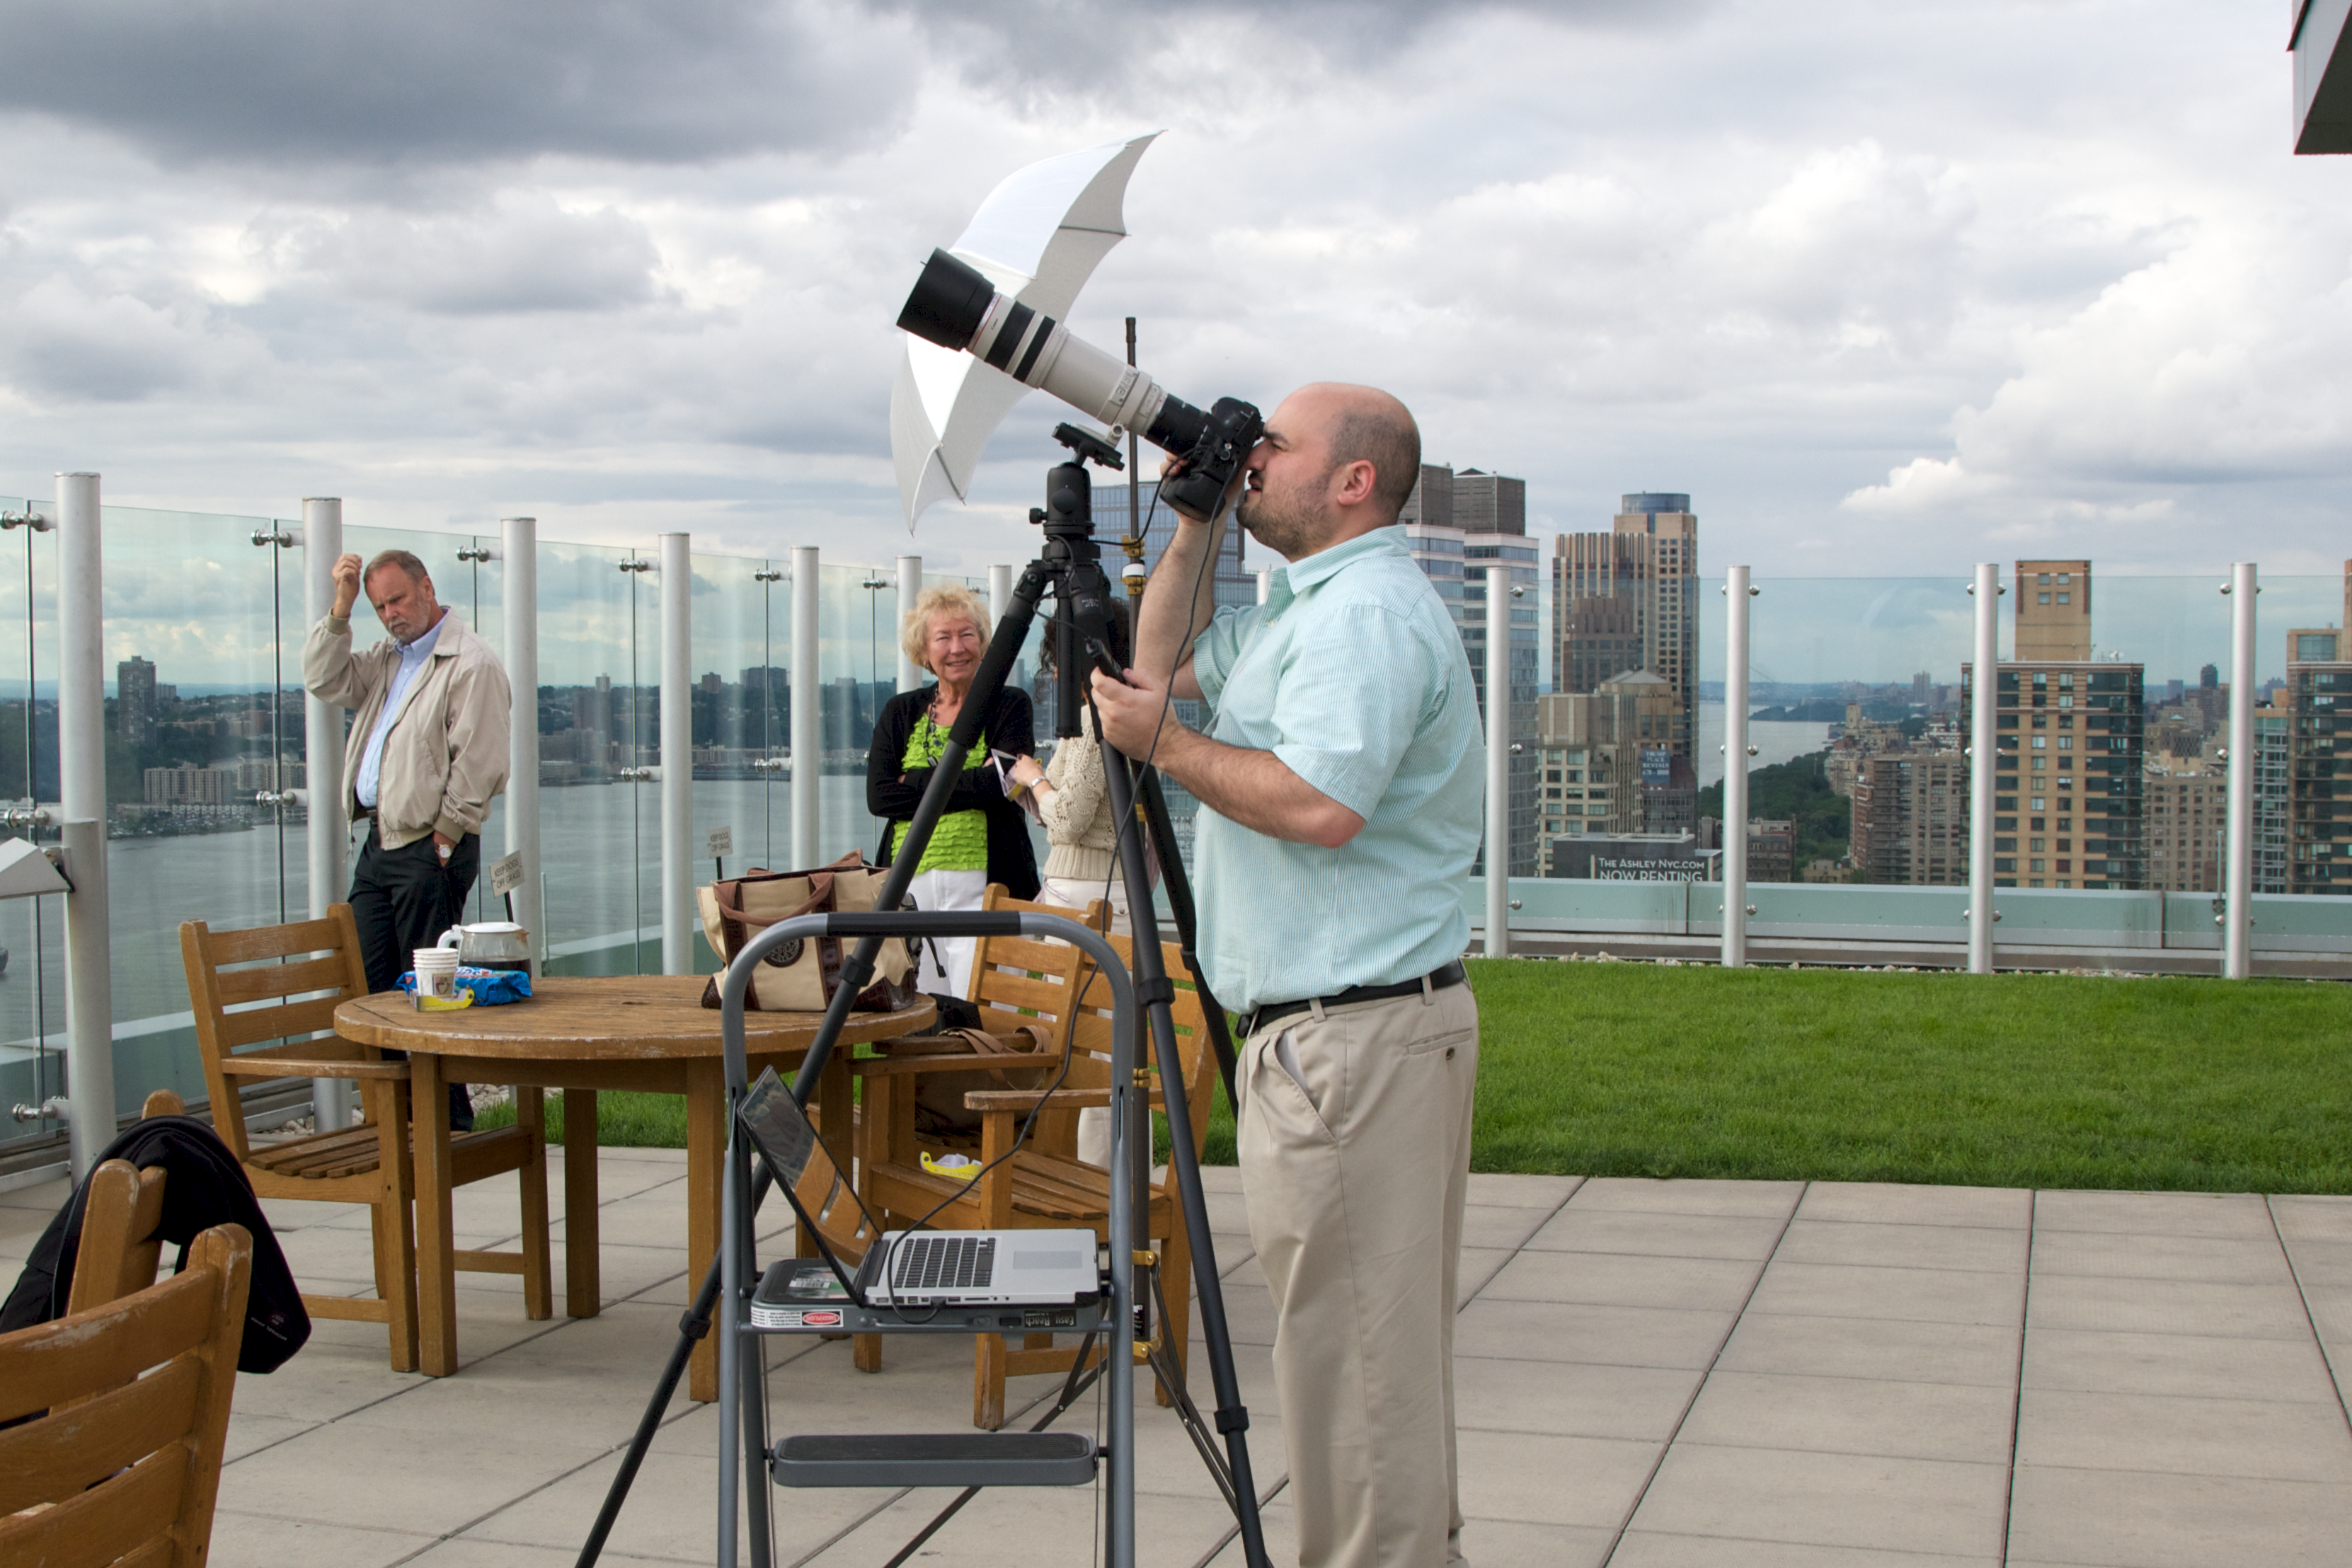
Adam Scott Wandt Photographing the Venus Transit.
Disclaimer: If you follow my instructions, you will be putting at risk thousands of dollars of equipment. While this method has worked for me several times in photographing the Sun, you undertake this advice at your own risk. I bear no legal responsibility if you or your camera equipment are damaged. In addition, I strongly suggest you do not involve children, drugs or alcohol.
Introduction
Photographing the Sun on a regular day is not something that most people know how to do. Photography a celestial event such as a solar eclipse or a planetary transit is even more challenging.
Photographing the Sun is extremely challenging because the Sun’s rays are so powerful that even during a solar eclipse, when 99% of the Sun’s rays are blocked, a short exposure for a fraction of a second can cause serious damage to your eyes and your camera’s sensor.
There are many techniques that allow people to observe the Sun and eclipses: pin hole projections onto white surfaces, the use of welders goggles, or the use of commercially available “eclipse glasses.” Obtaining high quality photographs is more difficult.
The Venus Transit occurs when Venus passes directly between the Earth and the Sun and won’t happen again for 100+ years. Venus appears as a small disk crossing the Sun – about the size of a marble next to a manhole cover. On June 5, 2012, the Transit will be visible from earth. From New York City, the beginning of the Transit will be visible, from 6:03 pm until sunset at 8:24 pm.
When I first heard about the Venus Transit, I wondered if a terrestrial-based photographer with an SLR camera could get high quality solar images. I could not find a simple answer. After several hours of research and experimentation, I developed a method that I hope will successfully capture high quality images of the Venus Transit. This technique can also be used to photograph the Sun on any given day and to photograph solar eclipses. I hope this blog summarizing my technique will help those in need of answers that I had trouble finding.
This method is not inexpensive, but many photographers may already own a majority of the equipment necessary.
What You Need:
(1) A Fairly High Quality SLR Camera
The method I have developed should work with most SLRs as long as your SLR accepts professional grade lenses. I use a Canon 5D MK II.
(2) Professional Grade Lens (Minimum 300mm)
Professional grade lenses are needed because while the Sun is huge, it is very very far away. Even with a 300mm lens, the Sun will not be large enough in your image to make an impact. Ideally, one would use a 600-800mm lens, but the high cost ($7,000 – $15,000) makes it cost prohibitive for most people. This is where a device called a teleconverter comes in handy (see #3). To photograph the Sun, I use a Canon EF 100-400mm 1:4.5-5.6 L IS.
(3) Lens Hood
To prevent glare and ghosting, an appropriately sized lens hood is important.
(4) Teleconverter
A teleconverter is a small optical tube that fits in between the lens and the camera. Teleconverters come in optical magnifications such as 1.4x, 2x and 3x. This means that if you use a 2x teleconverter on a 400mm lens, you get the equivalent of 800mm – a good focal length for solar photography. At a minimum, for good quality solar photography, you should use a 300mm lens with a 2x teleconverter. To photograph the Sun, I use a Canon 2x EF Extender III.
(5) Solar Filter
Without a proper solar filter, the Sun will fry your camera’s sensor and your eyes. A proper solar filter is so dark, you can’t see through it with your naked eye. It filters out all but 1/100,000 of the light coming through. There are not too many solar filter manufactures in the world. The only two I know of are in Japan and they cost around $100-$150. To photograph the Sun, I use a Kenko ND 100,000 67mm filter with a 77mm step-up ring to convert it to fit my 77mm wide lens. This filter reduces the amount of light coming into the camera by over 13 stops, making the Sun the only thing visible in the viewfinder. Another option is a Marumi 77mm ND 100,000 DHG neutral density filter, although good luck getting one because they have been sold out for weeks.
(6) Tripod
This set up weighs almost 20 pounds, so you will also need a high quality tripod that can hold something that resembles a small telescope. Since the Sun moves (and rapidly at this focal length) a high quality gimbal mount or ballhead is also important to keep the camera steady enough to capture the images you want. I use an Induro AT313 with a Vanguard SBH-300 head. B&H Photo has a really good educator’s discount on this tripod. (Thanks B&H Photo!)
(7) External Shuttle Release
This is handy as it will allow you to automatically expose and time the shots, making your only job to track the sun in your viewfinder and analyze your exposure on your laptop. I use a Canon Timer Remote Controller TC-80N3.
(8) Laptop
I tether my camera to my laptop for automatic photograph import which allows me to instantly analyze my photographs on a 15” screen rather than a 4” LCD screen. I use a 15” MacBook Pro with an i7 processor and 8 GB of RAM.
For review, here is the equipment I use:
- Camera: Canon 5D MK II
- Lens: Canon EF 100-400mm 1:4.5-5.6 L IS locked in at 400 mm
- Lens Hood
- Teleconverter: Canon 2x EF Extender III
- Solar filter: Kenko ND 100,000 67mm filter with a 77mm step-up ring
- Tripod: Induro AT313 with a Vanguard SBH-300 head
- Auto Shutter: Canon Timer Remote Controller TC-80N3
- Laptop: 15” MacBook Pro with an i7 processor and 8 GB of RAM
Solar Photography Workflow:
(1) Finding the Sun
After the equipment is assembled and mounted on the tripod, the first step is to find the Sun in the viewfinder. This might seem easy, but it’s not! The solar filter is going to make everything appear black – just like you have your lens cap on. The only thing that will be visible is the Sun (when you eventually find it). You will be amazed at how long it will take you to find it and how often you will lose it once you find it… it makes me laugh every time.
(2) Aperture
Aperture normally effects depth of field, light entering the camera, star-bursting, and distortion. In all of my experiments with solar photography, aperture does not seem to make much of a difference in context of a single photograph. I get the same great quality photography with f/8 as I do with f/22 (with different shutter speeds of course). However, there are advantages and disadvantages to using different apertures.
Advantages of f/22 (small aperture): Using a smaller aperture may limit the amount of light and heat reaching the sensor. Your camera will be pointed directly at the Sun for a long period of time and using a smaller aperture may provide some degree of protection to your sensors. See below for an additional method on how to avoid overheating or damaging your camera.
Advantages of f/5.6 (large aperture): If you plan on making a time lapse video of the solar event, all of my research shows that it is critical to open your aperture all the way to its maximum possible setting and leave it open the entire event. Leaving the aperture fully open is a method that will help prevent flicker that is common to time lapse photography. For more information on time lapse photography, go HERE.
(3) Shutter Speed
As to shutter speed, there is no easy answer. Since you will be using your camera on the manual setting, you can experiment with shutter speed to determine your optimal exposure. Keep in mind you will need to adjust your shutter speed as the Sun changes azimuth and altitude (the angle of the Sun above the horizon). Less light will reach your camera at lower altitudes meaning you have to increase the exposure times as the Sun get’s closer and closer to the horizon.
(4) External Shuttle Release
The advantage of using an external shuttle release is that you can set not only shutter speed, but also interval. This will help you take your photographs at regular intervals, making your only job tracking and evaluation. I use the following settings:
- Self timer – off
- Interval – 5 seconds
- Long – 00.00
- Frames – maximum setting (mine is 99)
(5) Tethering
There are no “redos” with an event like the Venus Transit, so it is important to be able to evaluate the photographs as they are being taken so you can make adjustments. Since you should be using a timed shutter system, you can’t evaluate your photographs on the LCD screen. It is also hard to evaluate using the LCD screen because it is small. To mitigate this issue, I hook up my SLR directly to my MacBook and stream the photographs right into Aperture (I also recommend Adobe Photoshop Lightroom 4). In Aperture, I am able to do live evaluations of the photography and adjust the shutter speed as needed.
(6) Protecting Your Camera From Light and Heat
Even when using a solar filter, my research shows that prolonged focusing on the Sun can still damage your camera. This is because heat will build up over time between the elements of the lens or in front of the camera’s sensor. The method that I use to prevent this is by having an assistant stand in front of the camera and on a regular basis cover the lens with an opaque object such as a piece of black cloth. I plan on keeping my lens covered for about 20 seconds of a given minute (1/3 of the time). While this method will make putting together a time lapse video difficult, it’s not worth destroying my camera. If you really want to do a time lapse video, you can try increasing the interval on the external shutter release to 15-20 seconds and have the assistant cover the lens during the interval.
(7) White Balance
I do not have a good answer for setting the white balance on your camera as I am still adjusting for it in post-production. If I come up with a good solution, I will update this blog.
Solar Photography Workflow: By The Numbers
- Be sure your batteries are fully charged.
- Assemble all equipment.
- Double check all equipment and in particular, ensure the proper placement of your solar filter.
- Set lens to manual focus and set your aperture.
- Take some test shots of the Sun to ensure everything is working properly. View your photos on your laptop to adjust shutter speed to achieve your desired exposure.
- Set your external shutter release to your desired settings and activate the system a few minutes before the Transit is supposed begin.
- Track the Sun while the camera is automatically taking photos.
- Ensure that your assistant is periodically covering the lens to allow heat to dissipate.
- Every few minutes, recheck exposure on your laptop and adjust as needed.
- Don’t stop taking pictures until a minute or two after sunset.
Conclusion
In order to take quality photographs of the Venus Transit, you will be required to conduct a virtual symphony of precise steps. I hope that this blog helps. Please leave comments with additional advice or sharing your experiences.
Now, please pray for good weather on June 5! I will post some photographs from the Venus Transit on my blog on the CUNY Academic Commons for personal enjoyment. Media or commercial use is available. Contact me for licensing information.
Follow Professor Wandt on Twitter
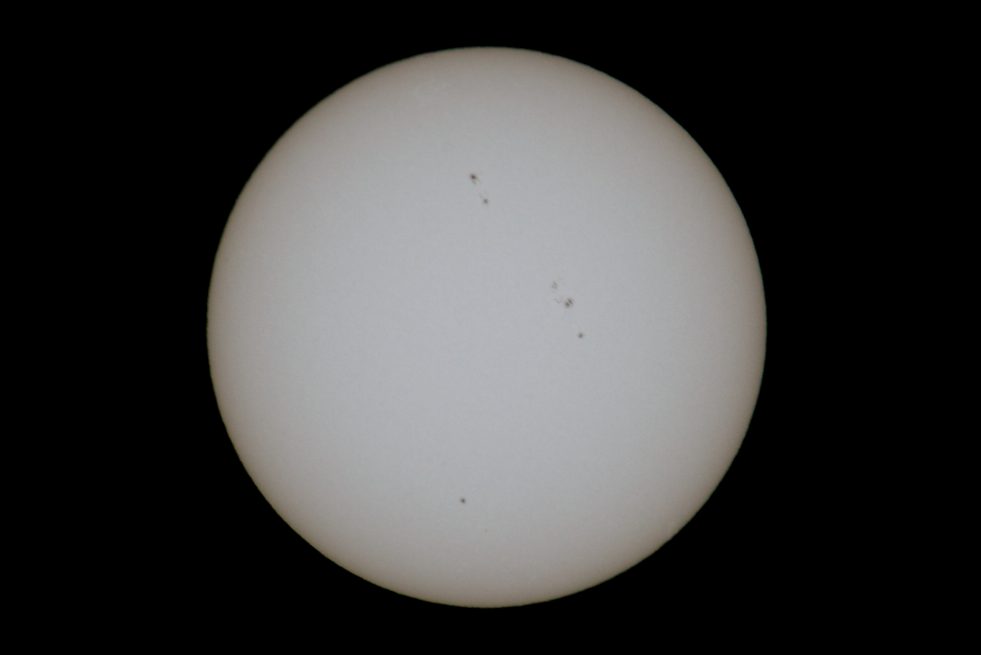
Sol © Adam Scott Wandt


Tip is great for adding knowledge about photography, you use the camera well and precise and reliable support tools, resulting in stunning image quality. Thank you for the information, it does make me interested to try it.
Thank you a bunch for sharing this with all of us you actually understand what you’re talking approximately! Bookmarked. Please also discuss with my site =). We will have a link alternate contract among us!
My shot: http://www.naztronomy.com/allgallery.php
It’s the first one from the Set. The one and Only that I was able to get.
p.s. I’m redoing the whole site, so it’s still in the works, I decided to just release it to the public today to show the Transit picture.
On White Balance: Set the camera to standard day light — no other changes are needed.
ON ISO: ISO does not mean much to me with the 5D MKII. The camera gets great results at any ISO. I recommend balancing the ISO with the shutter speed to get your shutter speed down to a second or less.
I have also tried adding a Tiffen 8 Yellow 2 color filter. It goes behind the ND-100,000. It gives the sun a yellow color so it’s not completely black and white. I will be taking pictures with – and without it.
Adam,
Again, I make no warrantees and take no legal liability for you following these directions. I look right through the view finder with my Kenko ND 100,000 filter. My understanding is that it filters out all but 1/100,000 of the light. Since its a grey ND, it does not discriminate color wave length so it filters out everything evenly. It filters out so much light… my exposures are .5 seconds – 2 seconds.
I also consulted with photo expert Peter Lipschutz from Adorama who feels I can shoot into the sun, indefinitely with the ND-100,000 filter and not have to worry about frying my camera or my eye. I still get nervous. I am using a black umbrella between shots and the LCD panel once the sun is in focus.
I can’t stress enough that these techniques are completely experimental.
Brenda, I have seen the Nikon guide but I think that it is very basic. I think my guide goes into greater detail.
Good tips! There’s also a few onhttp://www.nikonusa.com/Learn-And-Explore/Photography-Techniques/h1sctsrv/1/How-to-Photograph-a-Lunar-Eclipse.html
Can you provide any more information or stories from your experience working with the Kenko ND-100000 (1000k) filter? The Kenko websites are pretty limited and merely states “designed for solar imaging only” (what does that mean?)
In particular, does the filter extend beyond the visual range? That is, can I safely look at the sun through the view finder on a dSLR with a 300mm zoom lens and a ND 100k filter? Have you? Or would I end up burning my retina?
Also, lacking any teleconverters, will I acheive much with a Nikon D80, an 80-300mm Nikkor zoom lens, and a Kenko ND-100k filter? I’m not looking to take the next great photo with it, just hoping to see the transit (not that the weather is looking helpful). Will I be able to discern Venus? Or will I fry both my eyeball and my D80?
Thank you for your thoughts and insights.
Matt,
I don’t know for sure but I would not trust a ND 1000x. Maybe try stacking ten of them on top of each other 😉
I am sure you can get some #12 or #14 welding glass by tomorrow.
However, I don’t think your 200mm lens is worth the trouble (even with 25MPs). My 5D MK II is 24+mps and 200MM is insufficient. (even with zooming and cropping)
Thanks for the info. I only learned of the Venus Transit the other day, and locally the only filter I’ve been able to find locally (no time to order) is a 10 stop, ND 1000x (a B+W I believe). Would this be adequate for shooting the Venus Transit, or any sun shots, on my Sony Nex 7? I only have a 200mm telephoto and they don’t quite have 2x teleconverters available for the E-mount series yet, but I want to try anyways. The Nex 7 is 24MP so I would think I could get some decent Venus Transit shots at least after cropping at full resolution.
Just shared some pics with you over twitter.
I completely forgot about the white balance (or even selecting to save raw image files) because the sun was out for just 10 minutes between all the cloud cover. My shots aren’t as good as yours though.
Since I don’t have an aperture to deal with, I only worried about shutter speed and ISO. I found that some of my best shots were taken using ISO 200 and 1/60 sec shutter speed.
Can’t wait for Tuesday, hopefully weather plays nice.
Sorry, no Baader left over 🙁 I’m about half done with it, haven’t been able to work on this week because of work, I plan on finishing it up tomorrow and testing it out Sunday afternoon.
you can also use #12 or #14 welding glass which costs about $4 for a 4×5 square. you will have to adjust for the green in post process, but it is way cheaper and u can get it locally. now to rig it to my camera…thats another trick in itself….
Baader solar film will produce spectacular photographs with your telescope! I think your images will be awesome.
With my project – it is important to me to capture the images using standard photographic equipment (not a telescope). It will be great to compare photographs after the event!
Any Baader left over? 😉
Did you finish your filter yet?
Great post Prof. Wandt.
I plan on watching this transit from my roof (18 stories up) and I have a great view. But I’ll be using my telescope with my Canon to take the pics. Using a homemade solar filter (under construction) using Baader solar film.
I’ll be up on my roof this weekend testing out my set up. I’ll also be using my laptop to control my telescope (Using NexRemote software) as well as view shots right away. I don’t know if you remember it from class, but I have a huge 17″ Toshiba 😀
Hope I’ll be able to show off some of my shots, also can’t wait to see any that you post.
~Nazmus